After you have logged into Bitpanda Pro, let’s take a closer look at the far left of the main view and look at the orders section as seen in the image below. Here we are describing the full view that users with a large monitor see of the exchange interface. The view on mobile devices is adjusted to accommodate smaller screen sizes.

The “ORDER” section on the left side of your screen shows you the different order types you can use on Bitpanda Pro. An order is basically an instruction to buy (blue color) or to sell (red color) if certain conditions are met.
Blue for Buy and red for Sell
There are three different order types: market orders, limit orders and stop limit orders that either add liquidity to the order book (“maker orders” or “makers”) or remove liquidity (“taker orders” or “takers”). Fees for maker orders are usually lower because naturally, exchanges are interested in adding liquidity and increasing their offer - so maker orders pay less.
Market orders and taker orders
A market order is the most simple order type which is placed to be executed quickly. A market order is an instruction to buy or sell immediately once you push the button (place the order). Market orders are a type of order classified as a “taker order”. This means they “take” or “remove” assets from the order book which have been placed by other traders. Taker fees are higher than maker fees.
Limit orders
A limit order takes a while longer to execute as it is meant to execute at the limit price that you specify or at a “better price”.
Let’s say the price for BEST/EUR is currently at EUR 0.06. You want to buy but judge the price a little too high. Therefore, you place a limit buy order for a limit price of EUR 0.05. You then wait for your order to execute at the price of EUR 0.05 once there are matching bids at this price level.
Better price
However, if the price for BEST/EUR is currently at EUR 0.09 and you place a limit buy order for a limit price of EUR 0.13, your order will, at first, turn into a market order (for immediate execution). Why? This is where the “better price” principle kicks in and you will buy up the asset until it reaches your specified limit price. You will pay a taker fee since you “took” liquidity out of the order book.
Matching bids
When you place a limit order, it is also important to know that if there are not enough matching bids for your order - that is, orders placed by traders who want to buy or sell on your terms - your order will not execute or only partially execute.
Maker orders
Therefore, if the amount of your order was larger than what was available in the order book, the remaining amount of your order will now be considered an “open-limit buy order” and you will hence pay a maker fee, as the remainder of your order adds liquidity to the order book and your order is now considered a “maker order”.
The limit order is the type of order you want to use:
- If you want to place an order that is not for immediate execution
- If you want to buy at a lower price than the market price
- If you want to sell at a higher price than the present market price
Stop limit orders
A stop limit order is not instantly executed but at first set to “active” only. You specify the “Stop price” and your order is only triggered once this stop price is reached or set. It then goes into the order book where it becomes a regular limit order.
For example, you want to place a sell order once the price of Bitcoin reaches or crosses EUR 7,000. If the price of Bitcoin reaches EUR 7,000 (the stop price), your order to sell one Bitcoin at a price of EUR 6,900 (limit price) will be triggered and placed in the order book.
You can read up on order types in more detail on the Bitpanda Helpdesk here.
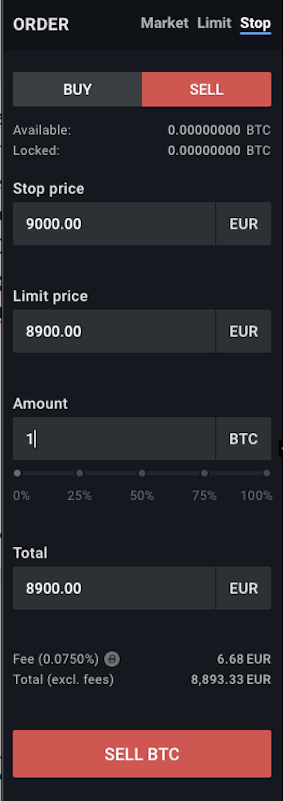
Beneath “BUY” and “SELL”, there are two indicators: “Available” and “Locked”. “Available” indicates the balance of your funds that are available for trading and that you can still use. “Locked” indicates the amount of funds you have already used during the placement of an order, like a limit order.
When placing an order, you start by selecting the type of order you want to place - a market order for immediate execution, a limit order for execution at a limit price or better or a stop order that goes in the order book once a specific price is triggered.
If you are trading manually, besides entering the amount you want to buy or sell, you also have the option to use the slider with a scale from 0% to 100% to select a certain percentage of your funds in a particular asset you are holding for trading.
Next, we will look at the section “MARKETS” and “MARKET HISTORY” displayed in the screenshot below - in the full view of the trading interface, this section is located on the right-hand side.
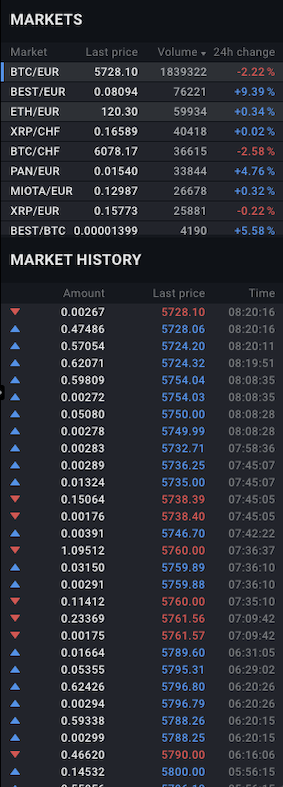
Markets and Market History
The “MARKETS” section provides an overview of all available trading pairs on Bitpanda Pro. By filtering, you can also reverse the order of trading pairs, look at the last price or volume from highest to lowest and vice versa, as well as the price fluctuations over the past 24 hours.
“Volume”, by the way, stands for trading volume - the value in the amount of assets traded on Bitpanda Pro over a certain period of time (i.e. the last 24 hours). Sufficient volume in the order book is the prerequisite for the execution of any trade.
The “MARKET HISTORY” section beneath “MARKETS” indicates the last 80 trades on Bitpanda Pro in chronological order for the trading pair you have selected, showing the amount, price and time of each trade. Viewing this section provides you with data for informed trading decisions.
Finally - your orders and the price chart
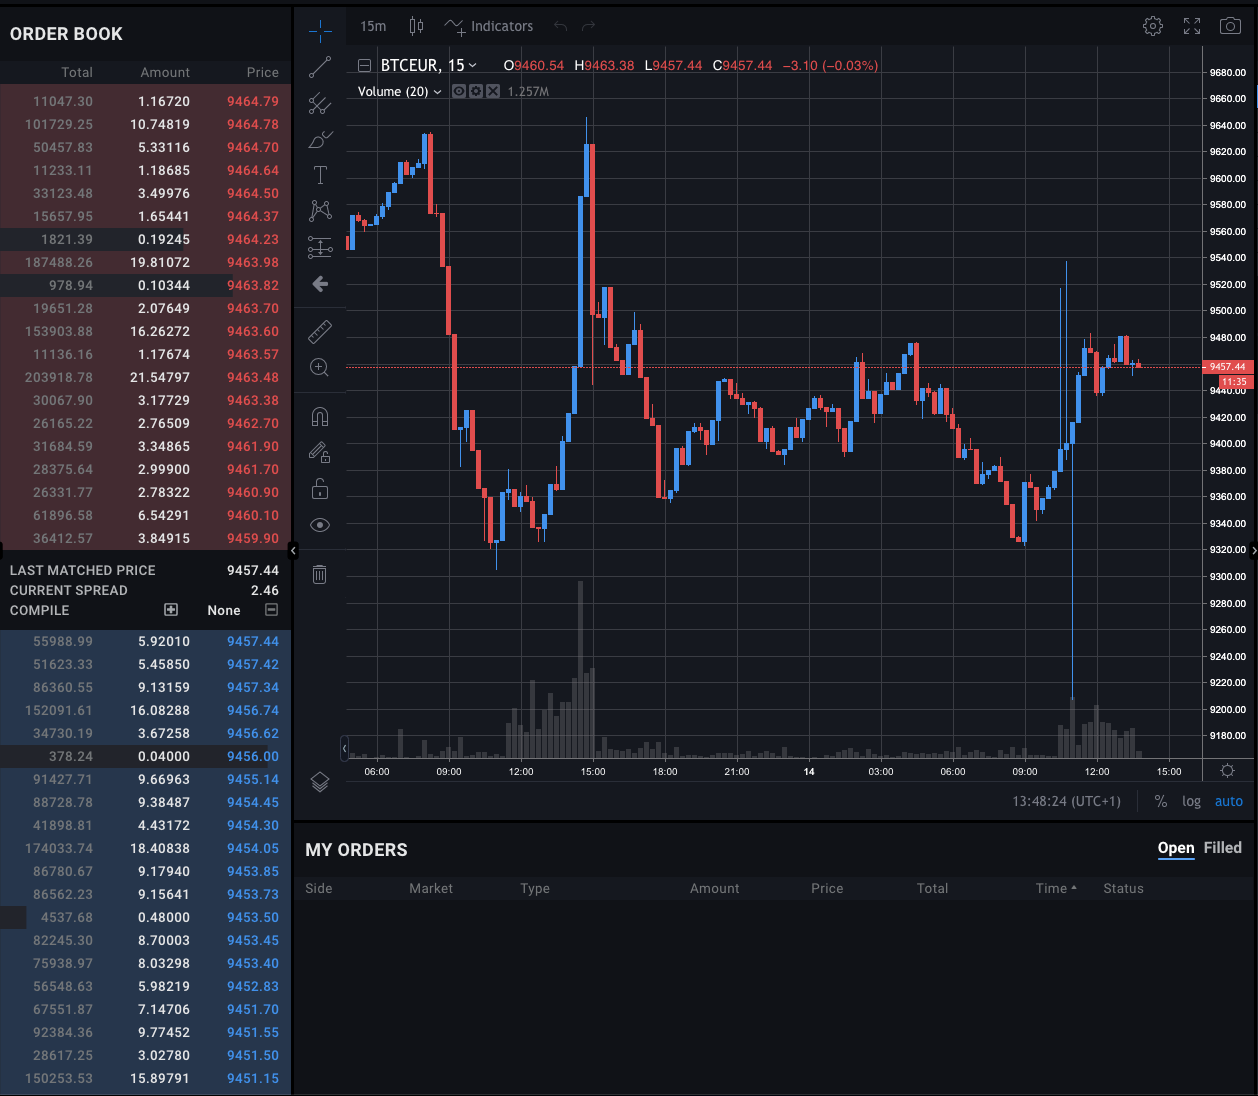
Finally we have made it to the heart of the trading interface - the price chart. Note that this section is not labelled “price chart”. Beneath the graph section showing the chart, in “MY ORDERS” you can view the orders you have placed - however, you cannot edit them in this section, only delete the entire order if need be.
The price chart with red and blue patterns showing upwards spikes and downward dips indicates trading activity and trading patterns.
If you hover your cursor over a specific part of the price chart on your screen, you can see a trading pair’s market price in closer detail. We’ll elaborate on the symbols to the left of the chart in more detail in an upcoming article.
At the bottom of the price chart is a gray bar graph. The highest bars indicate the most popular trading times, which relates directly to trading volume. Also, the higher the grey bar, the higher the spike in the red and blue graph, which means that more trades were available and executed at that time.
Now you know the basics of the Bitpanda Pro trading interface. If you feel you still need further information before you actually start to trade on your own, our Bitpanda Helpdesk offers several articles regarding Bitpanda Pro.
Please note that cryptocurrency trading may involve a significant level of risk and is not suitable for inexperienced users.
Are you ready?
Start trading on Bitpanda Pro now!
 Cryptocurrencies Buy, sell & swap cryptocurrencies
 Stocks* Invest in stocks with zero commissions
 ETFs* Invest in ETFs 24/7
 Crypto Indices The world's first real crypto index
 Precious Metals Invest in precious metals
 Commodities* Invest in commodities 24/7
 Leverage Go Long or Short on top cryptocurrencies
 Bitpanda Crypto Index Never miss out on the next asset
 Savings Plan A savings plan for Bitcoin and more
 Bitpanda Spotlight New assets are waiting for you
 Bitpanda Cash Plus Earn high-yield returns from 24/7 availability
 Bitpanda Club Additional benefits for our most valued customers
 Bitpanda Limit Orders Invest on autopilot with Limit Orders
 Bitpanda Blog Be the first to learn the latest news, announcements, and stories from the world of investing, cryptocurrencies, stocks and precious metals
 BITCOIN What to know when you are just starting to invest
 ASSET MANAGEMENT Your investment, your assets: Why your money is safe with Bitpanda
 BTC halving 2024 The Bitcoin halving is complete - we have everything you need to understand this pivotal moment in crypto history.
 COUNTDOWNBitcoin Halving Countdown 2024
 ACADEMYWhat is the Bitcoin halving?